Cabinet Painting Sacramento is a big job and is usually best done by a professional. It is important to remove all cabinet doors to prepare for painting. It is also important to scrub and clean all surfaces. This is because paint will not bond with greasy surfaces.
A good primer will help the paint adhere to the surface. A good top coat will protect the cabinets and add a nice sheen.
Cabinets typically comprise the largest visual square-footage in your kitchen, so getting them right is extremely important. An unprofessional paint job can make the whole room look bad – and will certainly be noticeable and embarrassing. The last thing you want to happen is to invest your time and money into a DIY project that doesn’t turn out well.
Before you start painting, you’ll need to prep the cabinets, ensuring they have the best chance of a flawless finish. This includes sanding and cleaning the surfaces, which are often coated with grease and grime from years of cooking. You’ll also need to choose the correct primer, paint, and topcoat for your project. These products should be selected for their ease of application, durability, and odor level.
If you’re planning on painting the cabinets a dark color, a high-quality primer is essential. This will help the new paint adhere properly and prevent stains from showing through. In addition, a good primer can help reduce flaking and peeling later on, which is common in moisture-prone areas like the kitchen.
You should use a fine-grit sandpaper to scuff the surface of the cabinets, which will give them a rougher texture that’ll help the paint and primer stick better. You can sand by hand or use an electric sander, depending on the size of your job. Once the sanding is done, clean the surfaces to remove any dust particles.
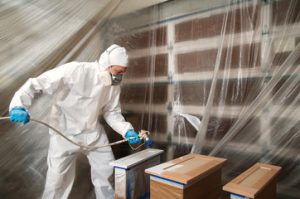
Finally, you’ll need to cover the surrounding surfaces with tarps or paper or plastic covers, in order to protect them from paint splatters and drips. This is especially important if you’re refinishing the countertops, backsplashes, or other surfaces in the same area as your cabinets.
It’s also a good idea to number the cabinet doors while they’re removed, so you can easily reattach them afterward. This will save you a lot of headache and frustration later on! Once everything is back in place, enjoy your newly painted cabinets and a fresh kitchen! For the highest quality results, hire a professional to complete your project. A local team like Walla Painting can ensure that your cabinets have the perfect finish and look brand new!
Primer
One of the most important steps in the cabinet painting process is applying the primer. This small step helps make sure that the paint job looks great and lasts a long time. The primer hides stains, old paint and other imperfections in the surface of the cabinets. It also provides a smooth base for the top coat of cabinet paint.
There are several different types of primers to choose from, depending on the type of finish you want to apply. Stain blocking primers are ideal for covering darker stains that may show through the topcoat of paint. They can also be used on surfaces that have been refinished with nicotine stain or water damage. These types of primers can be expensive and take longer to dry than other primers.
Adhesion primers are suitable for slick surfaces like laminate and glossy paint. They create a strong bond between the surface and the new paint, which helps ensure that the finish won’t chip or peel. These types of primers can be more expensive than other types of primer, and they don’t hide stains as well as stain-blocking or odor-hiding primers.
After the cabinet primer has dried, sand the surface of the cabinets to create a slightly rough surface that will provide better adhesion for the top coat of paint. This will also help to smooth out any bumps or dings in the cabinets, and it will help to create a nice, even finish.
Once the sanding is complete, wipe down the surfaces with a damp cloth to remove any dust and dirt. Then, apply a second coat of primer and allow it to dry completely before moving on to the final coat of paint.
After the second coat of primer is dry, sand the surface again to smooth out any bumps or dings. Then, clean the surface of the cabinets with a degreaser or liquid deglosser to ensure that it is free from oil and grease. This will help the new paint to adhere properly, and it will also prevent mildew growth in moisture-prone areas like the kitchen.
Paint
Painting cabinets is a huge undertaking, so it’s important to make sure that you have the right paints. You’ll want a high-quality cabinet paint that will protect the finish and hold up well to everyday wear and tear. You’ll also want a top coat that will be resistant to mold, mildew and water damage. The right top coat will also help to keep your cabinets from scratching and marring. Choose a water-based acrylic top coat that will provide easy cleanup and long-lasting beauty.
There are many different types of cabinet paints on the market, so it’s important to research them thoroughly before choosing one. A good place to start is by looking at the products that are recommended by professional painters in your area. These are typically products that have been tested and found to be durable and easy to work with. They also have a low VOC content, which means that they are safer for the environment.
After you’ve chosen the right paints, it’s time to begin your project. It’s best to remove all of the cabinet doors and hardware before you begin, as this will allow you to better paint the edges without getting them dirty. It’s also a good idea to label each door and its corresponding hardware before removing them, as this will help you to remember where everything goes when it’s time to reattach them.
You’ll then need to sand down the surface of your cabinets with a fine grit sandpaper, wipe down again and then prime with an oil-based primer. The primer should be formulated to adhere to painted or raw wood, and it should also be able to prevent stains from bleeding into the new paint.
Once the primer has dried, you can apply your base coat with a brush or roller. Then, let it dry for about 2 hours before applying the second coat. You’ll also want to give the first coat of paint at least 24 hours to cure before you apply your protective top coat.
For my cabinet painting project, I used INSLX Cabinet Coat in White. This product is a hybrid acrylic/urethane paint that gives a hard, durable finish with excellent coverage and leveling. It also dries to a factory-smooth finish and has minimal brush marks, as well as being water-cleanup and low VOCs.
Finish
Cabinets are available with a variety of finishes, including painted and stained. The choice depends on your personal preference and the look you want to achieve. Painted cabinets are easier to clean and offer a wide range of colors, but they may show wear more quickly than stained wood.
Staining the cabinets allows the natural wood grain to show through and adds a timeless, traditional appearance. The stain can also protect the wood from water and other liquids. However, the process is time-consuming and can result in a blotchy finish.
If you’re looking for a modern look, satin paint is an excellent choice for its durability and sheen. This type of finish resists oil and moisture, making it an ideal choice for high-traffic areas like kitchens. It also hides imperfections well and reflects light nicely.
To ensure a smooth, professional finish, it’s important to carefully prep the cabinet surfaces before painting. You’ll need to sand the surface to remove any glossy lacquer and smooth it out before beginning. You can sand by hand or with an electric sander, depending on the size of your project. Be sure to clean the sanded area thoroughly and patch any holes or imperfections with spackle or wood filler.
It’s also essential to cover all exposed surfaces with tarps or newspaper to prevent any stains from the paint. If you’re not comfortable with the task of painting your cabinets yourself, it’s worth hiring a professional. They’ll have the tools and experience necessary to get the job done correctly and efficiently.
To find the right contractor, ask for referrals from friends and family. Make sure to ask for photos of their work, as this can give you a good idea of the quality of their workmanship. Also, ask about their experience removing cabinet doors and drawers without damaging the surfaces underneath them. By doing your homework, you can find a professional that meets all of your needs and produces a quality finish you’ll love.